
There is a specific kind of radiance that seems to follow stars across the red carpet—a seamless, golden luminosity that looks less like a product and more like a permanent vacation in the Mediterranean. For those of us preparing for a high-stakes event, whether it is a summer wedding or a professional gala, achieving that same confidence-boosting glow often feels like a gamble between a flawless finish and the dreaded orange streak.
As an entertainment editor who has spent over 15 years navigating the high-pressure environments of the Oscars and the Cannes Film Festival, I have seen firsthand how the right glow can transform a look. The secret, however, is rarely a single miracle product. Instead, the celebrity aesthetic is the result of a disciplined process involving precise skin preparation, the correct choice of active ingredients and a strategic application method.
To achieve a professional-grade result at home, one must move beyond the basic application and treat self-tanning as a multi-step skincare regimen. By focusing on these expert self-tanning tips, you can bypass the common pitfalls of sunless tanning and achieve a result that looks authentic, hydrated, and sophisticated.
The foundation of any successful sunless tan is understanding the chemistry at play. Most modern self-tanners rely on a compound called dihydroxyacetone (DHA), a colorless sugar that reacts with the amino acids in the dead layers of the skin’s surface to create a browned color. This process, known as the Maillard reaction, occurs in the stratum corneum, meaning it does not penetrate the deeper layers of the skin. Because it only affects the surface, the quality of that surface—your skin texture—dictates the quality of the tan.
Choosing Your Glow: The Product Guide
Before applying any product, you must select the medium that aligns with your skin type and the level of intensity you desire. Not all self-tanners are created equal, and using the wrong formula for your skin’s needs is the primary cause of patchiness.
Tanning Mousses are the gold standard for those seeking a dramatic, immediate change. They are typically fast-acting and provide a “guide color,” which allows you to notice exactly where the product has been applied. This makes them ideal for beginners who struggle with missed spots. However, because they are concentrated, they require a tanning mitt to avoid staining the palms.
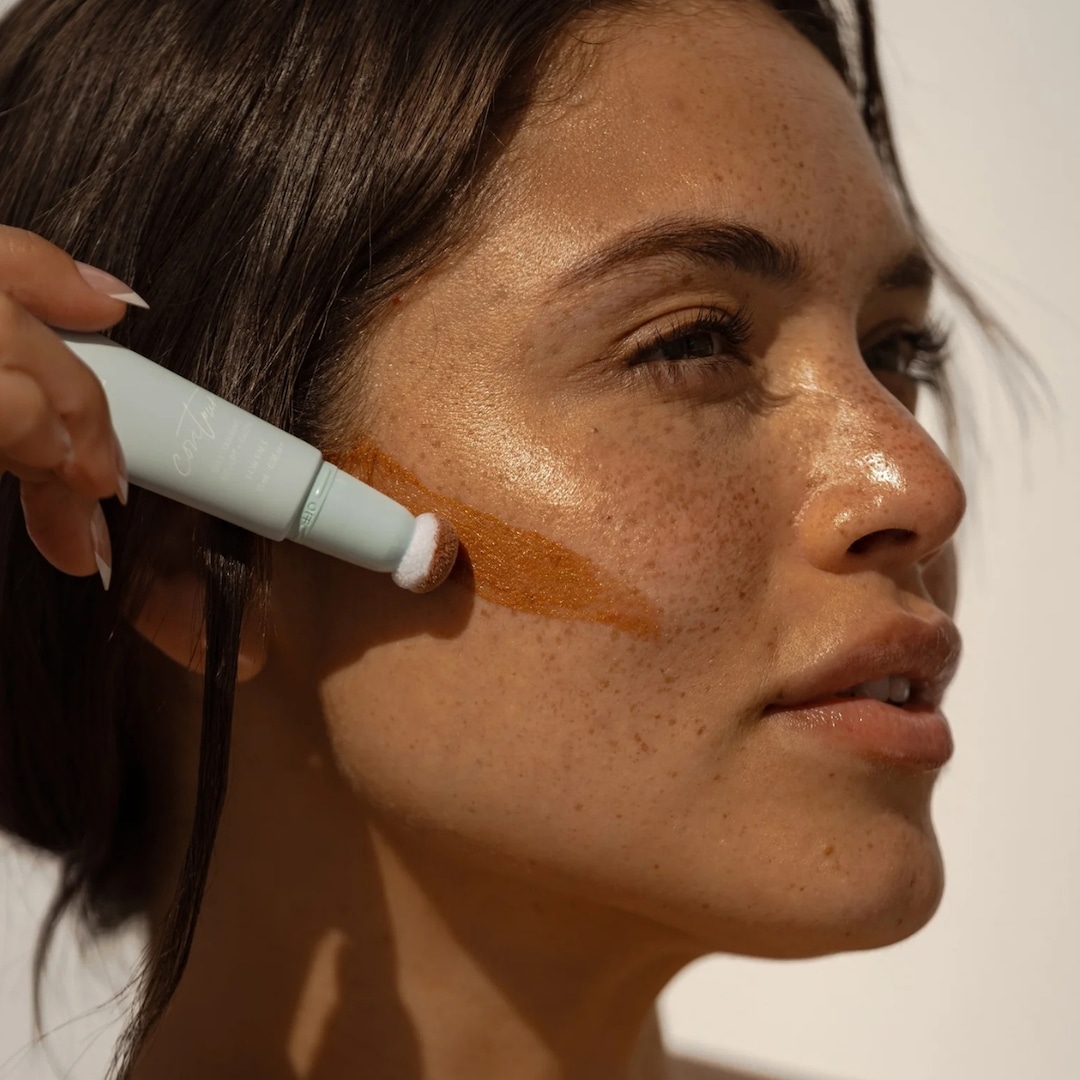
Self-Tanning Drops have become a favorite among celebrity makeup artists for their versatility. These concentrated DHA drops are mixed into your existing moisturizer or serum. This allows for a customized shade—using a few drops for a subtle “weekend in the city” look or more for a deeper bronze. They are particularly effective for the face, where skin is more prone to dryness.
Gradual Tan Lotions are designed for those who prefer a slow build. These products contain a lower concentration of DHA, allowing the color to develop over several days. This method is the safest way to avoid streaks and is highly recommended for those with very fair skin who are wary of an overnight transformation.
Professional Spray Tans offer the most uniform application because the product is misted onto the skin. While these are often done in-salon, at-home spray tans are possible with the right tools. The key advantage here is the ability to contour the body by applying slightly more product to the outer edges of the muscles, a technique frequently used on red carpets to create a more toned appearance.
The Non-Negotiable Prep Phase
The most common mistake in sunless tanning is rushing the application. A celebrity glow is 70% preparation and 30% application. Without the proper canvas, the DHA will cling to dry patches and dead skin cells, resulting in a spotted or “leopard print” effect.
Exfoliation is Mandatory
Twenty-four hours before you plan to tan, you must perform a full-body exfoliation. This removes the buildup of dead skin cells, ensuring the tanner adheres evenly. A physical scrub or a chemical exfoliant (such as a body wash containing salicylic or glycolic acid) works best. Focus specifically on “friction points” where skin is thicker and more prone to buildup: the elbows, knees, ankles, and knuckles.
The 24-Hour Rule
It is critical to exfoliate and shave at least 24 hours before applying the tan. Shaving opens the pores; if you apply tanner immediately after, the product can settle into the follicles, creating tiny dark dots known as “strawberry legs.” Giving your skin a full day to recover allows the pores to close and the skin’s pH level to stabilize, leading to a more seamless finish.
Hydration Strategy
While you want your skin clean, you do not want it overly moisturized immediately before tanning. Heavy creams or oils act as a barrier, preventing the DHA from reacting with the skin. However, Make sure to apply a lightweight, oil-free moisturizer to the driest areas—the ankles, elbows, and wrists—just before application. This “primes” these areas so they do not absorb the tanner too aggressively, which is what typically causes those tell-tale dark patches.
Application Masterclass: Step-by-Step
To avoid streaks and ensure a natural transition, the application must be systematic. The goal is to mimic the way the sun naturally hits the body.
- Work from the Bottom Up: Always start at your ankles and work your way up toward your torso. This prevents you from leaning over areas you have already tanned, which can create creases and streaks in the product.
- Use a Tanning Mitt: Never apply mousse or lotion with your bare hands. A high-quality velvet mitt ensures an even distribution of product and protects your palms from turning orange.
- The “Light Touch” Technique: Use long, sweeping motions. Avoid rubbing the product in aggressively; instead, glide it across the skin. For the joints, use a “buffing” motion with whatever product is left on the mitt rather than adding more.
- The Face and Neck: Use a separate, dedicated face tanner or drops. The skin on the face is thinner and more sensitive. Apply the product in the center of the face and blend outward toward the hairline. Ensure you blend the product down the neck and across the collarbones to avoid a visible “mask” line.
- The Finishing Touches: Once the application is complete, use a clean makeup brush or a cotton swab with a bit of moisturizer to blend around the nail beds and the edges of the wrists.
Maintaining the Glow and Safe Removal
A self-tan begins to fade the moment it is applied. The difference between a tan that looks “fake” as it fades and one that looks like a natural tan wearing off is the aftercare.
Moisturize Daily
Hydrated skin sheds more slowly. By using a daily body moisturizer, you prevent the skin from peeling in patches, which causes the tan to look splotchy. Avoid oil-based products or heavy scrubs during the life of your tan, as these can strip the color prematurely.
Avoid Harsh Chemicals
Chlorine and salt water are notorious for breaking down DHA. If you are swimming, apply a thin layer of waterproof sunscreen or a barrier cream to help lock in the color. When showering, use lukewarm water rather than hot, as excessive heat can accelerate the fading process.
The Fade-Out Process
When it is time to refresh your glow, do not try to “scrub off” the aged tan with an abrasive sponge. Instead, use a chemical exfoliant or a dedicated tan-removal foam. These products break down the DHA bonds more gently than physical scrubbing, allowing you to start with a fresh, smooth canvas for your next application.
Safety, SPF, and Skin Health
One of the most dangerous misconceptions about sunless tanning is that the resulting color provides protection from the sun. It does not. DHA changes the color of the dead skin cells on the surface but does nothing to protect the living cells underneath from ultraviolet (UV) radiation.
According to dermatological standards, a self-tan provides zero SPF value. It is imperative to apply a broad-spectrum sunscreen of at least SPF 30 every day, regardless of how dark your fake tan appears. In fact, because a tan can mask the early signs of sunburn (the redness), users may inadvertently stay in the sun too long, increasing the risk of skin damage.
For those with sensitive skin or conditions like eczema and psoriasis, it is advisable to perform a patch test on a modest area of the arm before a full-body application. While DHA is generally recognized as safe, some individuals may experience irritation from the fragrances or preservatives found in certain tanning formulas.
Quick-Reference Tanning Guide
| Method | Best For… | Development Time | Risk Level |
|---|---|---|---|
| Mousse | Immediate, deep bronze | 2–8 Hours | Medium (Streaking) |
| Drops | Customizable, facial glow | Overnight | Low (Natural) |
| Gradual Lotion | Subtle, low-maintenance | 3–5 Days | Very Low |
| Spray Tan | Professional, contoured look | 4–12 Hours | Low (if professional) |
Achieving a celebrity-level glow is not about the price tag of the bottle, but the precision of the process. By prioritizing exfoliation, selecting the right formula for your skin type, and maintaining hydration, you can step into any event with the confidence that your glow is seamless and sophisticated.
The next major trend in sunless tanning is the integration of skincare actives—such as hyaluronic acid and niacinamide—directly into tanning formulas to treat the skin while bronzing it. Preserve an eye on upcoming product releases from clinical skincare brands as this hybrid category expands.
Do you have a go-to tanning secret or a horror story from your first attempt at a fake tan? Share your experiences in the comments below or tag us in your glow-up photos on social media.