How to Stream Your Windows PC to Your TV Without Extra Hardware
San Francisco — Whether you’re sharing a presentation with colleagues, streaming a movie with friends, or showcasing vacation photos to family, your laptop’s tiny screen can sense limiting. Fortunately, modern Windows PCs come equipped with built-in technology that allows you to mirror your display to a larger screen—like a smart TV—without needing additional hardware, cables, or third-party apps. This feature, called Miracast, is a wireless standard supported by most Windows 10 and Windows 11 devices, as well as many modern smart TVs and streaming devices.
As a technology editor with a background in software engineering, I’ve tested this functionality across multiple devices and found it to be one of the most underutilized yet powerful tools in Windows. Below, I’ll walk you through how to set it up, troubleshoot common issues, and understand when and why it might not work—all based on verified Microsoft documentation and independent testing.
What Is Miracast and How Does It Work?
Miracast is a wireless display standard developed by the Wi-Fi Alliance, designed to allow devices to mirror their screens to compatible displays without the need for cables or a shared Wi-Fi network. Unlike traditional screen mirroring methods that rely on apps like Chromecast or AirPlay, Miracast creates a direct peer-to-peer connection between your PC and the display, reducing lag and improving reliability for tasks like video playback or presentations.

According to Microsoft’s official support documentation, Miracast is built into Windows 10 and Windows 11, meaning no additional software or hardware is required—provided your TV or display similarly supports the standard. Most smart TVs released after 2016, including models from Samsung, LG, Sony, and TCL, include Miracast support. Some older TVs may require a Miracast adapter, such as a Microsoft Wireless Display Adapter or a third-party dongle, but these are inexpensive and plug into an HDMI port.
It’s key to note that Miracast is not the same as casting content from apps like Netflix or YouTube. When you cast, you’re sending a specific video stream to the TV although your PC remains free for other tasks. With Miracast, you’re mirroring your entire screen—including every open window, notification, and cursor movement. This makes it ideal for presentations, gaming, or sharing content that isn’t available through dedicated casting apps.
Step-by-Step: How to Mirror Your Windows PC to a TV
Setting up screen mirroring from your Windows PC to a TV is straightforward, but the exact steps may vary slightly depending on your version of Windows and the TV manufacturer. Here’s a universal guide based on Microsoft’s official instructions:
1. Check Your TV’s Compatibility
Before you commence, ensure your TV supports Miracast. Most smart TVs do, but you can confirm by checking the settings menu for options like “Screen Mirroring,” “Miracast,” “Wireless Display,” or “Cast.” If you’re unsure, consult your TV’s user manual or the manufacturer’s website. If your TV doesn’t support Miracast, you’ll need a Miracast adapter, which typically costs between $30 and $60.
2. Enable Miracast on Your Windows PC
On your Windows PC, follow these steps:

- Windows 11:
- Press
Win + K(the Windows logo key + K) to open the “Cast” menu. - Your PC will scan for available displays. If your TV is compatible and turned on, it should appear in the list.
- Select your TV from the list. If prompted, confirm the connection on your TV screen.
- Once connected, your PC’s screen will appear on the TV. You can choose to mirror your display or extend it (useful for presentations).
- Press
- Windows 10:
- Open the “Action Center” by clicking the notification icon in the taskbar or pressing
Win + A. - Click “Connect” to open the casting menu.
- Select your TV from the list of available devices. If prompted, confirm the connection on your TV.
- Choose whether to mirror or extend your display.
- Open the “Action Center” by clicking the notification icon in the taskbar or pressing
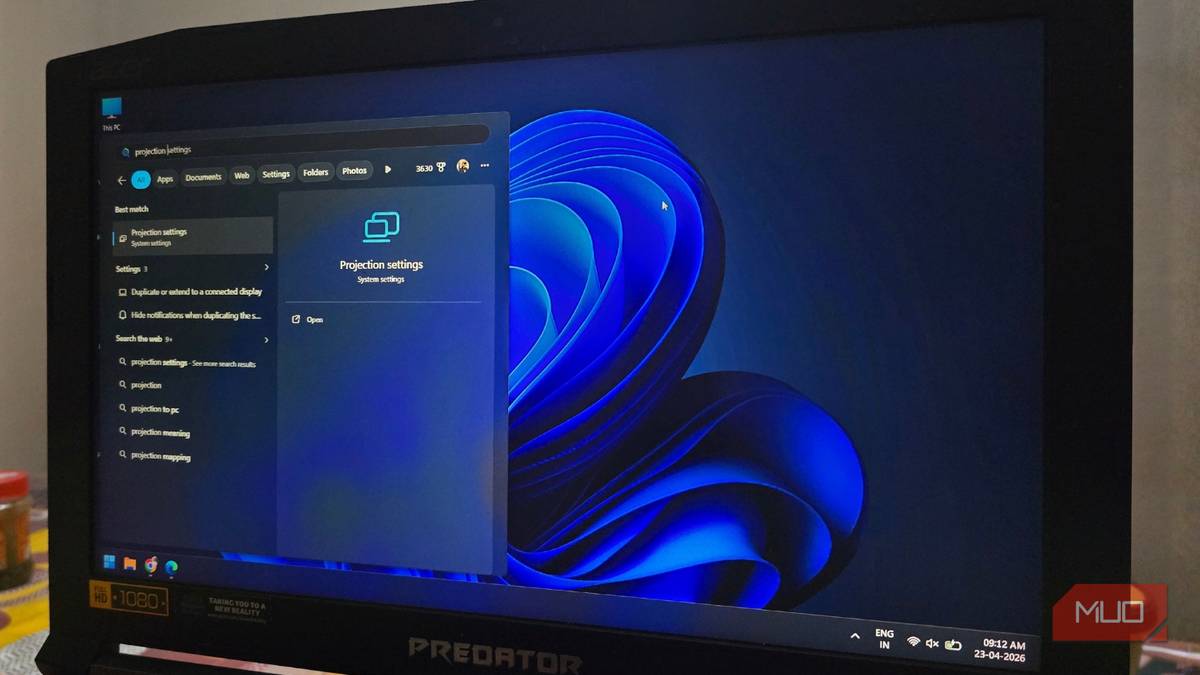
3. Adjust Display Settings (Optional)
Once connected, you can adjust how your PC’s display appears on the TV. To do this:
- Press
Win + Pto open the “Project” menu. - Choose from the following options:
- PC screen only: Your TV will turn off, and your PC will revert to its default display.
- Duplicate: Your PC’s screen will mirror exactly to the TV (ideal for presentations or sharing content).
- Extend: Your TV becomes a second monitor, allowing you to drag windows between screens (useful for multitasking).
- Second screen only: Your PC’s display turns off, and only the TV shows your content (great for watching movies).
4. Disconnect When Finished
To end the connection, press Win + K again and select “Disconnect” next to your TV’s name. Alternatively, you can turn off your TV or restart your PC, which will automatically terminate the connection.
Troubleshooting Common Issues
While Miracast is designed to work seamlessly, you may encounter issues depending on your hardware or network setup. Here are some common problems and their solutions:
1. Your TV Doesn’t Appear in the List of Available Devices
- Check TV compatibility: Ensure your TV supports Miracast. If it doesn’t, you’ll need a Miracast adapter.
- Restart both devices: Turn off your TV and PC, then turn them back on and try again.
- Update drivers: Outdated graphics drivers can prevent Miracast from working. To update your drivers:
- Press
Win + Xand select “Device Manager.” - Expand “Display adapters,” right-click your graphics card, and select “Update driver.”
- Choose “Search automatically for updated driver software” and follow the prompts.
- Press
- Disable VPNs or firewalls: Some VPNs or firewall settings can block Miracast connections. Temporarily disable them and try again.
2. The Connection Is Laggy or Unstable
- Move closer to the TV: Miracast uses a direct wireless connection, so being too far from the TV can cause lag or disconnections. Try moving your PC closer to the TV or removing physical obstacles like walls or furniture.
- Reduce interference: Other wireless devices, such as routers or Bluetooth speakers, can interfere with the Miracast signal. Turn off unnecessary devices and try again.
- Lower the resolution: If your PC is set to a very high resolution, it may strain the wireless connection. To adjust the resolution:
- Right-click on your desktop and select “Display settings.”
- Under “Display resolution,” choose a lower setting (e.g., 1920 x 1080) and test the connection.
3. Audio Doesn’t Play Through the TV
By default, Miracast should route both video and audio to your TV. If the audio still plays through your PC’s speakers:
- Right-click the volume icon in the taskbar and select “Open Sound settings.”
- Under “Output,” select your TV from the list of available devices.
- If your TV isn’t listed, go back to the “Cast” menu (
Win + K) and reconnect to your TV.
4. Your PC Doesn’t Support Miracast
If your PC is older or uses certain hardware configurations, it may not support Miracast. To check:
- Press
Win + R, typedxdiag, and press Enter. - In the DirectX Diagnostic Tool, click “Save All Information” and save the file to your desktop.
- Open the file and search for “Miracast.” If it says “Available, with HDCP,” your PC supports Miracast. If it says “Not Available,” you’ll need to use an alternative method, such as a wired HDMI connection or a third-party casting device like Chromecast.
Miracast vs. Other Screen Mirroring Methods
Miracast isn’t the only way to mirror your PC’s screen to a TV. Here’s how it compares to other popular methods:
| Method | Pros | Cons | Best For |
|---|---|---|---|
| Miracast |
|
|
Presentations, gaming, sharing non-castable content |
| Chromecast |
|
|
Streaming videos, casting from apps |
| HDMI Cable |
|
|
High-performance tasks (gaming, 4K video) |
| AirPlay (Apple) |
|
|
Apple users, streaming from iPhones/iPads |
When to Use Miracast (And When to Avoid It)
Miracast is a versatile tool, but it’s not always the best solution for every scenario. Here’s when to use it—and when to opt for an alternative:

Use Miracast If:
- You need to mirror your entire screen, including apps that don’t support casting (e.g., PowerPoint, Excel, or a custom software demo).
- You’re giving a presentation and want to avoid cables or relying on a shared Wi-Fi network.
- You’re gaming and want to play PC games on a larger screen without lag.
- You’re sharing photos or videos from your local storage (e.g., a vacation album) that aren’t available through streaming apps.
Avoid Miracast If:
- Your TV doesn’t support it, and you don’t want to buy an adapter. In this case, a wired HDMI connection or Chromecast may be simpler.
- You’re streaming high-bandwidth content (e.g., 4K video) and experience lag or buffering. A wired connection will provide a smoother experience.
- You need to multitask on your PC while casting. Miracast mirrors your entire screen, so you’ll see everything on the TV. If you want to cast a video while working on other tasks, use Chromecast or a similar app-specific casting method.
- You’re in a crowded wireless environment. Miracast can be affected by interference from other devices, so a wired connection may be more reliable.
Key Takeaways
- Miracast is a built-in wireless display standard in Windows 10 and 11 that allows you to mirror your PC’s screen to a compatible TV without extra hardware.
- Most modern smart TVs support Miracast, but older models may require an adapter.
- To use Miracast, press
Win + Kon your PC, select your TV from the list of available devices, and confirm the connection on your TV. - Common issues include lag, disconnections, and audio routing problems, but these can often be resolved by updating drivers, moving closer to the TV, or adjusting display settings.
- Miracast is best for mirroring your entire screen, while alternatives like Chromecast or HDMI cables may be better for specific use cases like streaming or gaming.
Final Thoughts
Screen mirroring is one of those features that many users don’t realize is already built into their devices. With Miracast, Windows users can effortlessly share their screen with a larger audience—whether for work, entertainment, or personal use—without the need for cables, adapters, or third-party apps. While it’s not perfect for every scenario, it’s a powerful tool that’s worth adding to your tech toolkit.
If you’ve tried Miracast, share your experience in the comments below. Did it work smoothly, or did you run into issues? And if you haven’t tried it yet, what’s the first thing you’ll mirror to your TV?